It’s Week 3 for the $100 Room Challenge- Let’s see if I was able to make any progress in our Dining Room. Fingers crossed…
If this is your first time here to my little blog- Welcome! And Thank You so much for stopping by! My name is Jackie, as in the Jackie of Jackie Can’t Blog! I am a self-taught decorator- that loves to work within a super tight budget. I can remember as a young girl of maybe 6 or 8 years old- having a conversation with my Mother about becoming an interior designer. It has always been something that I have been passionate about and will always enjoy doing. Ever since my childhood bedroom to my first apartment in my late teens, I have decorated my own home and helped family and friends with theirs. I started my blog to show that anyone really can have a home that they love. I hope I can give you a small bit of inspiration too.
This $100 Room Challenge is just the type of thing that this DIY Crafty Girl loves to do!

A $100 Budget
The $100 Room Challenge was started by my sweet friend Erin of Lemons, Lavender, and Laundry.
The rules are simple- One Room, One Month, $100. Awesome, right? Erin started the challenge on her blog with just one room in her own home. You can read all about that over on her site on the page- $100 Room Challenge. Over the years she has opened up the challenge to other bloggers such as myself. The challenge happens twice a year in January and September. This is my third time working on the challenge. For this time around the group has about 30 different bloggers all taking on a space in their home for $100.

Share the love!
What I love most about this group is just how supportive we all are for each other. We all check up and read each other’s blog posts. Follow one another on all the social media platforms. We click. We like. We comment. We support. It’s kind of amazing. You should follow the hashtag on Instagram- #100roomchallenge. You can see all of the photos that the group is posting for each of our own $100 projects.
Be sure and go check out my new friend Carmen of Living Letter Home! She has been working on her pantry for the $100 Room Challenge. She and her hubby just put up some shchmediumlap up on the walls. Don’t know what “

Want to see what you might have missed here?
Click on the links below for the other posts on my Dining Room $100 Room Challenge:

Easy DIY Artwork- anyone can do!
Got picture frame? Got paper? Got tape?
Have I got an easy peasy project for you!
One of my projects for this $100 Room makeover is to change out the scrapbook paper collage on my cork-board. Trust me- any. one. can. do. this!

This is the before paper collage
For the Girl who likes to change her decor- I was looking for a simple way to change up the artwork, but not completely change it. I wanted to be able to mix it up when I was tired of it- and I am. Using Navy, Turquoise, Sand, Beige, and White patterned papers I layered them together on my cork-board.
Check out my post on how I painted this cork-board with 22 different colors in a quilt pattern- A Thrifted Makeover- A Cork Board? Yep!

Pattern on Pattern on Pattern
I collect scrapbook paper. It’s kind of a problem, but I love color and pattern and it is an inexpensive item to purchase. Most of the craft supply stores often have amazing sales around holidays so that you can sometimes get sheets for as low as 10 cents each! I also buy papers at the thrift store- also for just a few pennies a piece. Like I said- kind of a problem.
For this project, I used what I already had in my craft stash. $0 spent here. How did I change up the paper collage? Easy! I rolled pieces of tape on the backside of each sheet of scrapbook paper and layered them on my cork board until I liked the way it looked. I will go back in and add wood push pins to complete this project.

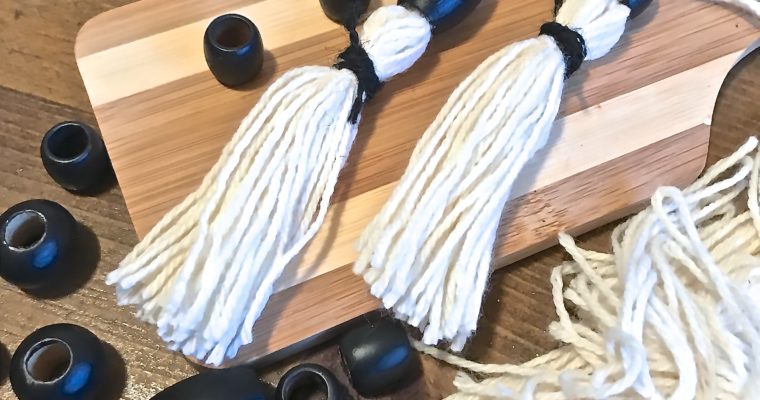
DIY Yarn Tassels for Texture
Adding a little something for interest
This week I have been working on another one of the Four original projects for the Dining room. Sewing new curtains from drop cloth fabric I had leftover from another project. While I was finishing the hem on one of the panels- I had an idea to add some DIY yarn tassels to add some texture to the plain Jane drop cloth curtains. I chose- again from my craft stash- some Cream colored yarn. For a few nights after work, I made tassels- 30 tassels in all. I just love a good craft that is fun and easy.
***I won’t give you a tutorial on how to make them- there are so many on Pinterest or Youtube. Check some out and chose one that speaks to you.***

Adding interest to the Tassels
I really liked the Cream yarn on the Beige drop cloth- but I decided to add another layer of interest. Crazy, I know! I pulled out some wood beads that I had painted Black last year for another project and started to add them to the tassel tops. Then I got out some Black twine and added a layer over the band. I LOVE how they turned out! Very Boho Chic, don’t you think?
Next week I will share how I will use these tassels. It’s kinda cool- I think.

It always gets worse before it gets better…
Here is what the Dining Room looked like a couple of days ago. I was making some progress, working on a couple of projects, but the mess just seemed to continue to grow. I share this photo because I want you to know that it’s okay! One of my fellow bloggers commented that while they’re making one room over- the rest of the house gets trashed! It so does- just this time for me, it happened in the room I’m working on. Well, Huh.
Now go and check out what all the other bloggers are working on in the link up below! There is so much inspiration to be found in all of the $100 Room Challenge!


Jackie, truer words have never been spoken- both ‘it gets worse before it gets better; and ‘the rest of the house gets trashed when you makeover a room’ lol. Your dining room looks JUST like my master right now! It’s definitely absorbing all of the overflow from my closet! Love your scrapbook artwork idea, and I can’t wait to see how your room turns out!
It is so comforting knowing that others go through the same highs and lows! We will concur this mess! It will be pretty in the end.
Jackie I am loving these DIY tassels they are so fun! I can not wait to see your reveal!
Thanks, Jen! They’re such a fun and easy craft!
I am absolutely loving what I’m seeing so far! The scrapbook paper project is such a great way to add pattern and texture without too much commitment, and I cannot wait to see those tassels on the drop cloth curtains!!! (Also, last week I snapped a picture of the room I’m working on and it looked worse than the before shots. I was painting the walls, so EVERYTHING was thrown into the center of the room 🙂 ). It really does get worse before it gets better!