Did I tell you that I have signed up for the One Room Challenge, and I will be taking part as a Guest Participant? Yup. I am surprised too! This is another year of confronting my fears, so it seemed fitting to jump into another blogger challenge and grow my skills.
“Even if you fall on your face, you’re still moving forward.” -Victor Kiam
What is the ORC, you ask? It is a six-week design challenge featuring 20 interior designers and over 200 guest participants. Each one is challenged to makeover one room, collectively posting once a week over at the One Room Challenge website.
You can also see photos that are posted on Instagram using the hashtag #oneroomchallenge
Here is the basic plan that we are going to tackle over the next couple of weeks. You can see my first post on the One Room Challenge here.
- clean up the yard
- refresh the mulch for all of the garden beds
- tackle the ugly/ stained concrete slab
- build a potting table or bench
- makeover the found/ free cabinet
- refresh existing patio furniture- clean, stain or paint
- refresh or replace existing pillows and furniture cushions
- refresh or replace existing umbrellas
- rearrange the furniture layout
- move/ make a new home for the grill
- makeover the grill? paint legs? still undecided here
- refresh pots and containers for plants
- bring in LOTS of plants and succulents
- add more patio lights
- add color and texture
- do everything for under $300!!!
Not much of the plan has been accomplished, nothing is ready to be crossed off yet, but we still have some time!
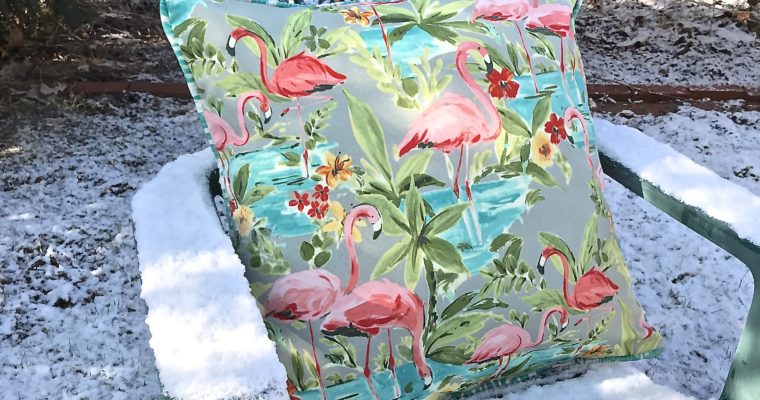
This week I did a bit of sewing. I was able to make two pillows using colorful Flamingo outdoor fabric, cording, and velcro. I did not do a tutorial this time around, as I am self-taught and NOT an expert! You can find so much better tutorials out there than I could give.

I am so in love with this Flamingo fabric! It is not the usual cartoonish type of flamingos that I have seen in the past. The fabric has a feel that is more that of a painting, a handpainted watercolor or acrylic. The sections of color look like brushstrokes. And the Gray color of the background makes it feel more mature, not so kitschy.

I am pretty proud of how these came out. They’re pretty big, 26″ square, have a contrasting piping, and a velcro closure. I have made pillows like this before, so it only took about an afternoon.

The morning that I wanted to take photos we had just received a fresh coat of snow. Ugh. But then I thought it would be funny to take my new summery Flamingo pillows for a little photo shoot in the snow. I mean the snow did look quite pretty, and the sun was shining.

I placed them here on our plastic chairs we keep in a back corner of the yard. This is not where the pillows will be used, but I think it makes for a cute photo!

The pillows will be used for a new wicker loveseat that I bought myself for my birthday a couple of months ago. I had a big birthday this year, one that ended in a zero. I had been wanting a loveseat, so I just did it! More on the loveseat next week!

Now I had made pillows with piping before, but it had been a couple of years. I kind of messed up the corners. You can see they’re a little pinched, not perfectly rounded. When I first noticed the mistake I was going to take them apart and re-sew them. But I decided that I kind of liked how it looked. The “mistake” added a little detail that was unexpected, so I left them! And I’m glad I did.

While this week’s weather has not lent itself to any outdoor projects, I was able to get a little thrift shopping and sewing done. Let’s hope that the warm-up the Weather Man has been calling for really shows up. In any case, I’m not worried. Not too much 😉 I hope you check back to see how I’m doing. Thanks for stopping by!


That fabric is so beautiful!! And your ability to sew pillows with piping has me impressed! I can sew a pillow cover in my sleep but not with piping! So intimidating!
Thank you Sheena! I used to think it was hard too, but I think its a lot like putting in a zipper. I just love the look of piping, it elevates the quality I think 😉